
Blog
How Are You Taking Pictures of The Important Nerve Plexuses? Advanced Imaging Methods Explained

Nerve plexuses resemble intricate wiring systems where fibers twist, branch, and move through tight anatomical spaces. These networks sit next to major veins, arteries, muscles, and layers of fat that interfere with signal clarity during scanning. Traditional imaging often failed to separate nerves from the surrounding tissues because nerves are small, similar in density to vessels, and often follow unusual pathways.
What Clinicians Look For in Imaging
Doctors need to detect intricate signs such as nerve enlargement, thickening, fascicular distortion, edema, compression, or early tumor involvement. They also examine changes linked to radiation effects, fibrosis, and neuropathic conditions. Because symptoms often appear late, imaging must reveal microscopic abnormalities before noticeable damage occurs.
3D Volume Imaging — Capturing a Full Neural Map
3D Isotropic Sequences (3D STIR SPACE)
Modern scanners use 3D isotropic sequences like 3D STIR SPACE to collect a cube of data instead of thin slices. This produces uniform resolution in every direction, making it possible to follow a nerve through curves, intersections, and deep pathways without losing detail.
Arbitrary Reconstruction and Multiplanar Reformatting
The digital cube can be sliced in any plane. Radiologists can rotate and reconstruct the image to trace the entire nerve path from origin to destination. This technique allows them to visualize structures that cannot be seen clearly on a single slice because nerves rarely travel in straight lines.
Maximum Intensity Projection (MIP)
MIP compresses the full 3D volume into a bright, glowing representation of the plexus. The nerves appear illuminated against a dark background, giving doctors a complete visual map of neural structures. This helps detect subtle deviations, mass effects, or narrowing along nerve pathways.
High-Tech Signal Suppression for Clearer Plexus Visualization
Fat Suppression Techniques (Dixon and STIR)
Since nerves are surrounded by fat, imaging sequences must suppress fat signals. Dixon and STIR technologies remove these unwanted signals and allow water-rich nerves to appear sharply defined. This suppression improves contrast and exposes abnormalities that may be hidden within the fat layers surrounding the plexus.
Vascular Suppression and Contrast Enhancement
Because veins and nerves can appear similar in size and brightness, vascular suppression is critical. Crusher pulses and specialized contrast agents such as Ferumoxytol help eliminate signals from vessels, making true nerve fibers stand out. These techniques prevent misinterpretation and improve the diagnostic accuracy of MR neurography.
Magnetic Resonance Neurography (MRN) — The Gold Standard
Why MRN Is Ideal for Deep Plexuses
MR neurography is considered the gold standard for imaging deep or complex nerve networks. It uses special MRI sequences designed to highlight nerves while suppressing interference from fat and blood. Deep structures like the brachial plexus, lumbosacral plexus, and pelvic nerves benefit greatly from the precision of MRN.
3.0T MRI Scanners and Advanced Reconstruction
Stronger magnetic fields offer higher resolution. A 3.0T MRI scanner can create detailed isotropic images that radiologists can rotate freely. This view provides a comprehensive understanding of how nerves relate to surrounding tissues and whether they are being compressed, stretched, or displaced.
Diffusion Tensor Imaging (DTI) as a Functional Biomarker
DTI measures microscopic water movement inside nerve fibers. Healthy nerves show organized, directional water flow. When nerve fibers are damaged, the movement becomes less structured. Fractional anisotropy values expose early compression or degeneration even before visual changes appear. Fiber tractography uses the diffusion data to generate a 3D, color-coded model of neural pathways, helping surgeons evaluate whether a tumor is pushing a nerve aside or growing through it.
High-Resolution Ultrasound — Real-Time Imaging of Superficial Plexuses
High-Frequency Probes (12–24 MHz)
High-resolution ultrasound offers a dynamic view of superficial nerve plexuses. With high-frequency probes, nerves appear as honeycomb patterns of fascicles in cross-section. This method excels in evaluating peripheral branches of the brachial plexus and other nerves located near the skin.
Dynamic Imaging for Functional Assessment
Unlike MRI, ultrasound can capture nerves in motion. When a patient moves the neck or raises an arm, doctors can watch nerves glide, stretch, or compress. This real-time capability helps diagnose conditions such as thoracic outlet syndrome, where symptoms worsen during specific movements.
Ultra-High Frequency Ultrasound (UHF up to 70 MHz)
UHF probes provide extraordinary detail and can reveal individual fascicles inside a nerve. This level of resolution surpasses MRI for superficial nerves and offers a near-microscopic view of neural architecture.
Elastography for Assessing Nerve Stiffness
Elastography measures how stiff a nerve is. Chronically damaged nerves often become firm due to scarring or fibrosis. This technique supports early detection of long-standing compression or traumatic injury.
Ultrasound-Guided Interventions
Because ultrasound provides real-time imaging, it is the preferred method for guiding injections, nerve blocks, and surgical instruments. The precision reduces complications and ensures accurate targeting.
Complementary Imaging Modalities in Nerve Plexus Evaluation
CT Myelography
When MRI is not possible, CT myelography becomes an important option. Contrast injected into the spinal fluid outlines nerve roots as they exit the spine, helping diagnose compression or structural abnormalities.
PET/MRI Hybrid Imaging
PET/MRI combines metabolic activity detection with anatomical detail. It can distinguish active cancer recurrence from tissue changes caused by previous radiation, providing clarity in complex cases.
Imaging the Major Nerve Plexuses: Techniques and Interpretations
Capturing detailed images of the brachial, lumbosacral, and abdominal nerve plexuses requires tailored approaches based on their anatomical location and clinical significance. The brachial plexus, extending from the neck to the arm, demands high-resolution imaging to reveal its branching structure. Modalities like MR neurography, diffusion tensor imaging (DTI), and ultra-high-frequency ultrasound are commonly used together. MRN provides volumetric anatomical views, DTI assesses microstructural nerve fiber alignment, and UHF ultrasound exposes the honeycomb-like fascicular details for accurate surface-level evaluation.
The lumbosacral plexus, situated deep in the pelvic region, is best visualized using 3D isotropic MR neurography with strong fat suppression. These techniques make it possible to rotate and slice the data in any direction, allowing radiologists to follow nerve pathways through the pelvis and detect signs of entrapment or degeneration. Meanwhile, the celiac plexus and other abdominal nerve networks benefit from a combination of MRI and PET/MRI, which together offer both structural and metabolic information. This combination is especially helpful in distinguishing between tumor recurrence and radiation-related tissue changes.
Future Directions and Diagnostic Insights in Nerve Imaging
Once imaging is complete, radiologists must interpret the findings by looking for changes in nerve size, shape, and signal quality. Abnormal thickening, enlargement, or loss of fascicular detail may suggest trauma, inflammation, or neuropathic changes. It’s also essential to track whether a tumor is displacing or invading a nerve, a difference that can greatly affect surgical planning and risk.
In addition to visible changes, modern imaging techniques allow for early detection using functional and microstructural data. Reduced fractional anisotropy (FA) values in DTI scans, altered fascicle patterns in high-resolution ultrasound, or increased stiffness in elastography may signal pathology long before symptoms appear.
The field continues to evolve with the development of higher-resolution MRI sequences, next-generation ultrasound probes, and AI-powered tools. Artificial intelligence is beginning to assist with automated nerve segmentation, early neuropathy prediction, and faster, more accurate image reconstruction. Together, these innovations are making nerve imaging not only more precise but also more proactive in identifying disease early and guiding treatment effectively.
Final Thoughts
Taking pictures of the important nerve plexuses requires a combination of advanced imaging techniques that emphasize clarity, depth, and functional analysis. From 3D isotropic MRI and MR neurography to DTI, high-resolution ultrasound, elastography, CT myelography, and PET/MRI, each technology contributes vital information that enhances diagnosis and guides treatment. As innovations continue to push the limits of resolution and accuracy, clinicians gain stronger tools to evaluate nerve health and improve patient outcomes.
FAQs
How does MRI help visualize nerve plexuses?
MRI uses high-contrast sequences that highlight water-rich nerves while suppressing signals from fat and blood, allowing deep plexuses to appear clearly.
Why is ultrasound useful for nerve imaging?
Ultrasound shows nerves in real time and can reveal how they behave during movement, making it ideal for diagnosing dynamic conditions.
What is DTI and why is it important?
Diffusion Tensor Imaging analyzes water movement within nerve fibers. It detects microscopic damage before structural changes appear.
Can nerve problems be detected early with imaging?
Yes, advanced methods like FA measurements, elastography, and UHF ultrasound reveal early abnormalities before major symptoms emerge.
When is CT myelography used instead of MRI?
CT myelography is used when MRI is not suitable, such as in patients with metal implants or severe claustrophobia.

The world of celebrity investing has evolved significantly over the years. While luxury cars, startups, and entertainment ventures continue to attract attention, many celebrities are increasingly turning to rental properties as a reliable source of long-term wealth. Real estate has long been recognized as one of the most stable investment vehicles, offering opportunities for passive income, portfolio diversification, and asset appreciation.
Unlike industries that may fluctuate with market trends, rental properties provide a tangible asset that can generate recurring income while increasing in value over time. For celebrities seeking financial security beyond their entertainment careers, real estate has become an attractive option.
The Appeal of Rental Property Investments
One of the primary reasons celebrities invest in rental properties is the opportunity to create consistent cash flow. Whether they own single-family homes, luxury apartments, or multi-unit developments, rental income can provide a steady revenue stream regardless of industry conditions.
Many high-profile investors understand that successful wealth preservation requires diversification. Rental properties offer protection against market volatility while providing long-term growth potential. As a result, real estate often becomes a cornerstone of a celebrity’s investment portfolio.
In addition to generating income, rental properties can offer tax advantages, equity growth, and opportunities for strategic expansion over time.
Real Estate Offers Long-Term Wealth Building
Property values historically appreciate over the long term, making real estate an effective wealth-building strategy. Celebrities and other investors often acquire properties in growing markets where demand remains strong.
As rental income helps cover mortgage expenses and operating costs, property owners can gradually build equity while benefiting from potential appreciation. This combination of income generation and asset growth makes rental properties attractive for investors focused on long-term financial goals.
The Importance of Professional Property Management
Owning rental properties can be rewarding, but it also comes with responsibilities. From maintenance coordination to tenant communication and lease administration, managing rental properties requires time and expertise.
Professional Property Management services help property owners streamline daily operations while maintaining positive tenant relationships. Experienced property managers oversee essential tasks such as rent collection, maintenance scheduling, lease enforcement, and financial reporting.
For celebrities with demanding schedules and multiple investments, professional management provides peace of mind and allows them to focus on other priorities while ensuring their properties remain profitable and well-maintained.
Why Tenant Screening Matters
A successful rental investment often depends on the quality of the tenants occupying the property. This is why tenant screening remains one of the most important aspects of rental property ownership.
Proper tenant screening helps landlords identify qualified applicants who demonstrate financial responsibility, stable income, and a positive rental history. By evaluating prospective tenants before lease approval, property owners can reduce the likelihood of payment issues, lease violations, and property damage.
Investors who prioritize tenant screening often experience fewer disputes and greater long-term stability within their rental portfolios.
The Value of Professional Tenant Screening Services
As rental portfolios grow, many investors choose to work with professional tenant screening services to improve consistency and accuracy during the application process.
These services typically verify employment, review credit history, conduct background checks, and assess rental references. The goal is to provide property owners with reliable information that supports informed leasing decisions.
For celebrities and large-scale investors managing multiple properties, professional tenant screening services can save time while helping minimize potential risks.
Understanding the Tenant Application Screening Process
A thorough tenant application screening process goes beyond reviewing a completed application form. Property owners and managers often evaluate several factors before approving an applicant.
Common components include:
- Employment verification
- Income verification
- Credit history review
- Rental history evaluation
- Reference checks
- Background screening
Comprehensive tenant application screening helps ensure that prospective renters meet the property’s requirements and can fulfill their lease obligations.
Rental Tenant Screening Helps Protect Investments
Rental tenant screening serves as a proactive risk-management strategy for property owners. Identifying reliable tenants before move-in can significantly reduce costly issues that may arise later.
The screening process for tenants provides valuable insights into an applicant’s financial behavior, rental history, and overall suitability. By making data-driven decisions, investors can improve occupancy quality and protect the long-term performance of their rental assets.
For celebrities managing valuable real estate holdings, effective rental tenant screening is often considered an essential part of preserving both property value and investment returns.
The Future of Celebrity Real Estate Investing
As more celebrities seek stable and scalable investment opportunities, rental properties are expected to remain a popular choice. Real estate offers a unique combination of income generation, asset appreciation, and long-term financial security that few other investments can match.
However, success in rental property ownership requires more than simply acquiring properties. Strategic Property Management, effective tenant screening, and sound operational practices all play critical roles in maximizing returns and minimizing risk.
By approaching real estate with a long-term perspective and leveraging professional expertise when needed, celebrities can continue building sustainable wealth through rental property investments.
Conclusion
The growing interest in rental properties among celebrities reflects a broader understanding of the value of real estate investing. Rental income, portfolio diversification, and long-term appreciation make real estate an attractive option for investors seeking financial stability.
At the same time, successful rental property ownership depends on strong management practices. Professional Property Management solutions, comprehensive tenant screening, and reliable tenant screening services help property owners protect their investments while creating positive experiences for tenants.
As celebrity investors continue expanding their real estate portfolios, these best practices will remain key drivers of long-term success.
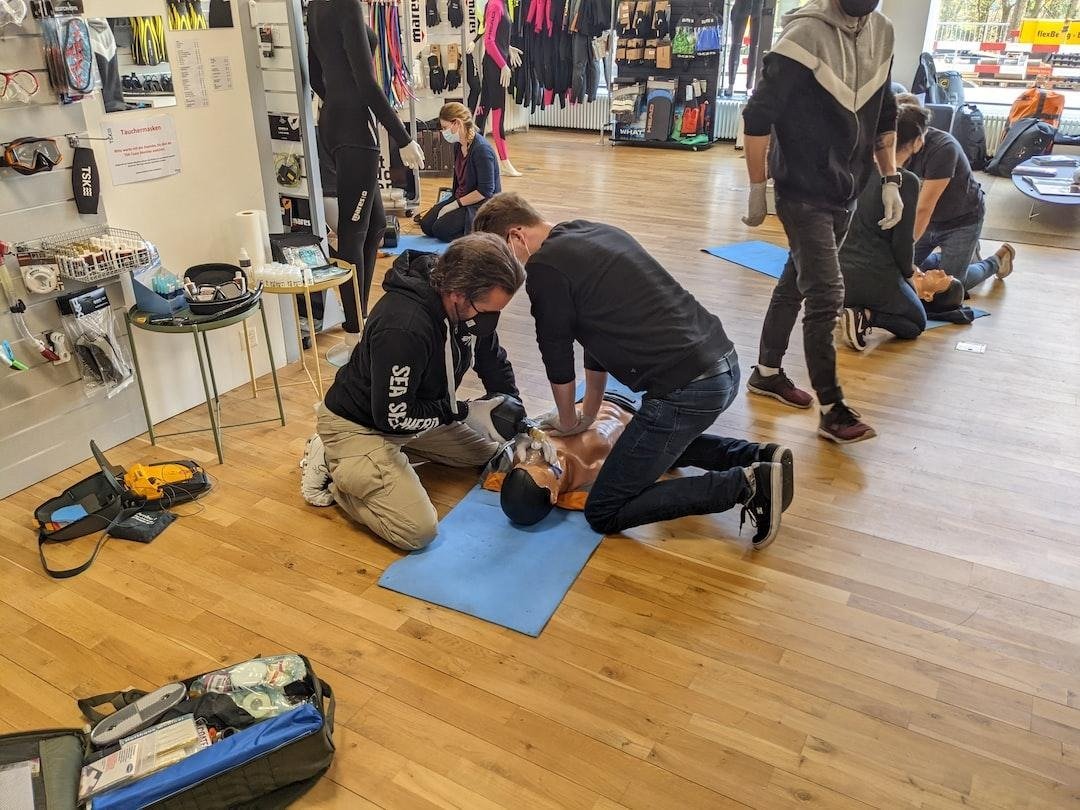
CPR certification gives people the skills to respond during emergencies when every second matters. It teaches simple steps that can help protect a life before medical help arrives. Many people choose this training for work, while others do it for personal reasons.
It can be useful at home, in public places, or in the workplace. Learning these skills can also build confidence during stressful moments. CPR certification programs are designed to be practical, easy to follow, and useful in real-life situations.
The sections below cover how these programs support safety and preparedness in everyday life.
Building Confidence During Emergencies
Emergencies can feel overwhelming without the right training. CPR certification helps people stay calm and take action with more confidence. It teaches what to do when someone stops breathing or becomes unresponsive.
Clear steps make it easier to respond without panic. Practice during training helps those actions feel more familiar. This confidence can make a big difference before emergency services arrive.
Learning Practical Life-Saving Skills
CPR programs focus on skills that can be used right away in real situations. Training often includes chest compressions, rescue breathing, and how to respond safely. These are practical lessons that go beyond theory.
Hands-on learning makes it easier to remember what to do under pressure. Repetition also helps improve response time. These simple skills can be valuable in many everyday settings.
Flexible Training Options for Different Schedules
Many CPR certification programs are designed to fit busy schedules. Some people prefer in-person classes while others choose online learning. A helpful option is using resources from programs like https://cprcertificationnow.com, where training can be completed in a way that works with daily responsibilities.
This flexibility makes it easier for more people to access important safety education. It also allows learners to move at a comfortable pace. More access means more people can be prepared to respond in an emergency.
Supporting Workplace Safety
Many jobs require CPR certification because safety is part of the role. It is especially useful in places where employees work closely with the public or with children.
Training helps staff respond quickly while waiting for medical professionals. It can also improve overall workplace emergency planning. A prepared team creates a safer environment for everyone around them, and this is one reason many employers encourage regular certification.
Helping Families Feel More Prepared at Home
CPR skills are useful beyond the workplace. Parents, grandparents, caregivers, and family members often take certification to feel more prepared at home.
Emergencies can happen without warning in everyday situations. Knowing what steps to take can reduce fear during those moments. It can also provide peace of mind for the whole household.
Encouraging Ongoing Safety Awareness
CPR certification often creates stronger awareness around health and safety. People become more mindful of emergency planning after completing training. They may also feel encouraged to refresh their skills over time.
This keeps knowledge current and useful. Safety awareness can spread into homes, schools, workplaces, and communities. The more people trained, the stronger the response during emergencies can be.
Find CPR Certification Programs for Safety and Preparedness
CPR certification programs give people practical skills that support fast action during emergencies. The training is simple, useful, and relevant in many parts of daily life. It helps people feel prepared when unexpected situations happen. It also builds confidence through practice and clear instruction.
Whether for work, home, or personal growth, these programs offer lasting value. Learning CPR is a step toward stronger safety and better preparedness for everyone.
Should you wish to read more, visit our blog. We’ve got more for you!

The rapid growth of AI computing is pushing data center networks into a new stage of development. As enterprises deploy larger GPU clusters and more advanced LLM platforms, network bandwidth has become one of the most important factors affecting AI performance. It is no longer enough to focus only on GPU specifications or model architecture. Without a high-speed, stable, and scalable optical network, AI computing resources cannot be fully utilized.
The 800G DR8 optical module is designed to meet this growing demand. Compared with traditional 100G or 400G connections, 800G DR8 provides much higher bandwidth capacity for modern data center environments. It is especially suitable for single-mode fiber connections in AI data centers, cloud platforms, and high-performance computing networks. For organizations building large-scale LLM infrastructure, 800G DR8 offers a practical path toward higher network capacity and better long-term scalability.
In LLM training environments, data movement is extremely intensive. Training large language models requires continuous communication between GPU nodes, storage systems, and distributed computing frameworks. Model parameters, gradients, training datasets, and checkpoint files all need to move quickly across the network. If the optical network cannot provide enough bandwidth, the entire AI training process may slow down. This directly reduces GPU utilization and increases operating cost.
800G DR8 helps solve this problem by providing high-speed single-mode connectivity for critical links inside the data center. It can be used for switch-to-switch connections, high-performance aggregation layers, and large AI cluster interconnects. With 800Gbps transmission capacity, the module helps reduce congestion and provides more bandwidth headroom for future AI workload growth.
For AI inference and TOKEN REQUEST platforms, 800G DR8 is equally important. A modern AI service platform may support multiple LLMs, code generation models, embedding models, image models, and multimodal systems at the same time. Each TOKEN REQUEST may be routed to different backend resources depending on model availability, cost, latency, and user demand. This creates complex traffic flows between API gateways, routing systems, inference servers, databases, storage clusters, and monitoring platforms.
As the number of TOKEN REQUESTS increases, backend networks must handle not only model input and output data, but also logging, billing, authentication, usage tracking, and system health monitoring. 800G DR8 provides the bandwidth needed to support these high-volume AI service environments. It helps platforms process more requests, reduce bottlenecks, and improve service consistency during peak traffic periods.
One of the major advantages of 800G DR8 is its use of single-mode fiber. This makes it suitable for longer and more flexible data center connections compared with short-reach multimode solutions. In large AI computing facilities, GPU clusters, storage zones, and core switching systems may be distributed across different rows, rooms, or buildings. Single-mode 800G connectivity allows operators to design the network with greater flexibility and prepare for future expansion.
800G DR8 also supports a cleaner upgrade path for data centers moving beyond 400G. As AI workloads grow, many operators are looking for ways to increase bandwidth without dramatically increasing cabling complexity. Deploying higher-speed modules such as 800G DR8 allows data centers to carry more traffic per port, improve switching efficiency, and simplify network architecture. This is especially valuable in high-density AI environments where rack space, power, and cooling are limited.
For LLM service providers, network reliability is just as important as raw bandwidth. If the optical link becomes unstable, TOKEN REQUESTS may be delayed, failed, or routed inefficiently. This can affect user experience and increase system retry rates. A stable 800G DR8 deployment helps ensure that model access, response delivery, and token usage records remain consistent across the infrastructure.
As AI moves from experimental deployment to large-scale commercial operation, data center networks must be designed for both performance and reliability. 800G DR8 optical modules provide the high bandwidth, single-mode transmission capability, and scalability needed for advanced AI computing environments.
In summary, 800G DR8 is a strong choice for AI data centers that need higher bandwidth and flexible single-mode connectivity. It supports LLM training, AI inference, distributed GPU clusters, and large-scale TOKEN REQUEST processing. For enterprises and service providers preparing for the next generation of AI infrastructure, 800G DR8 offers a powerful foundation for scalable, efficient, and reliable network growth.

What Audi drivers usually change in the summer: the most popular spare parts in the warm season

XO Streetwear Style Blending The Weeknd Merch and Human Made Clothing

Essentials vs Brain Dead Streetwear Brand Is Better in 2026
Who is Cuppy Enders? The Untold Story of Tommy Shaw’s First Wife
Who Is Sylvia Dale? Learn About The Wife of Johnnie Cochran

Scalable Industrial Solutions with Smart Design Systems & Financial Precision
-
 Celebrity5 months ago
Who is Cuppy Enders? The Untold Story of Tommy Shaw’s First Wife
-
 Celebrity6 months ago
Who Is Sylvia Dale? Learn About The Wife of Johnnie Cochran
-
 Business2 months ago
Scalable Industrial Solutions with Smart Design Systems & Financial Precision
-
 Celebrity9 months ago
Who Is Yeonmi Park’s Husband? Ex-Husband Ezekiel, Marriage, Divorce & Family Facts and More
-
 Biographies4 months ago
Who Is Agnetha Larsson? The Untold Story of Zara Larsson’s Mother
-
 Technology3 months ago
How System Maintenance Tools Improve Computer Performance and Security
-
 Celebrity8 months ago
Happy Dad Net Worth: Owners, Revenue & Brand Value
-
 Celebrity9 months ago
Will Sonbuchner Wife: Inside Sonny Side’s Love Life & Private Marriage